Sounds familiar? That's right. My version of The Golden Pillow 933, whom made its name in our local food scene for its famous Curry in the Loaf. Nice treat for curry lovers. Instead of buying French baguette or bread for your curry, it satisfies you with both at one go, all freshly made.
So I'm gonna do the homemade version called Curry within the Garlic Bread. Thanks to my husband's suggestion. This is a big leap in my baking and cooking journey. Fortunately, I have Panasonic SD-P104 Bread Maker and Panasonic NN-CS894 Steam Convection Microwave Oven, with my husband along side to help and guide me through the process.
Panasonic Bread Maker
Panasonic Bread Maker

You might have read my previous post on Sausage Buns. This will be the 2nd attempt in making Garlic Bread by reducing the amount on the herbs, garlic and onion. Hopefully no more wet and sticky dough for this recipe.
Starting with the bread dough. I'm gonna use Menu 9 Bread Dough which enables you to create your own flavoured buns. The ingredients and method for the dough are adapted from Panasonic Cooking recipe with a little modification.
Starting with the bread dough. I'm gonna use Menu 9 Bread Dough which enables you to create your own flavoured buns. The ingredients and method for the dough are adapted from Panasonic Cooking recipe with a little modification.
Preparation Time: 10 mins Required Time: 1 hour Serving: 2 persons
Ingredients:
- 280g Bread Flour, sieved
- 50g Butter
- 3 tbsp Brown Sugar
- 2 tbsp Milk Powder
- 1 tsp Salt
- 1/2 of Medium size Egg
- 160ml Cold Water, taken out from fridge
- 1/2 tsp of Spaghetti Bolognese Herbs
- 1/2 tsp of Minced Garlic
- 1/2 tsp of Minced Onion
- Garlic salt (at your preference)
- 1 tsp Instant Dry Yeast
- Add in all the ingredients except yeast into the bread pan.
- Place dry yeast in the yeast dispenser.
- Select Menu 9 for Bread dough and press Start.
- Once done, press stop and take out the bread pan immediately.
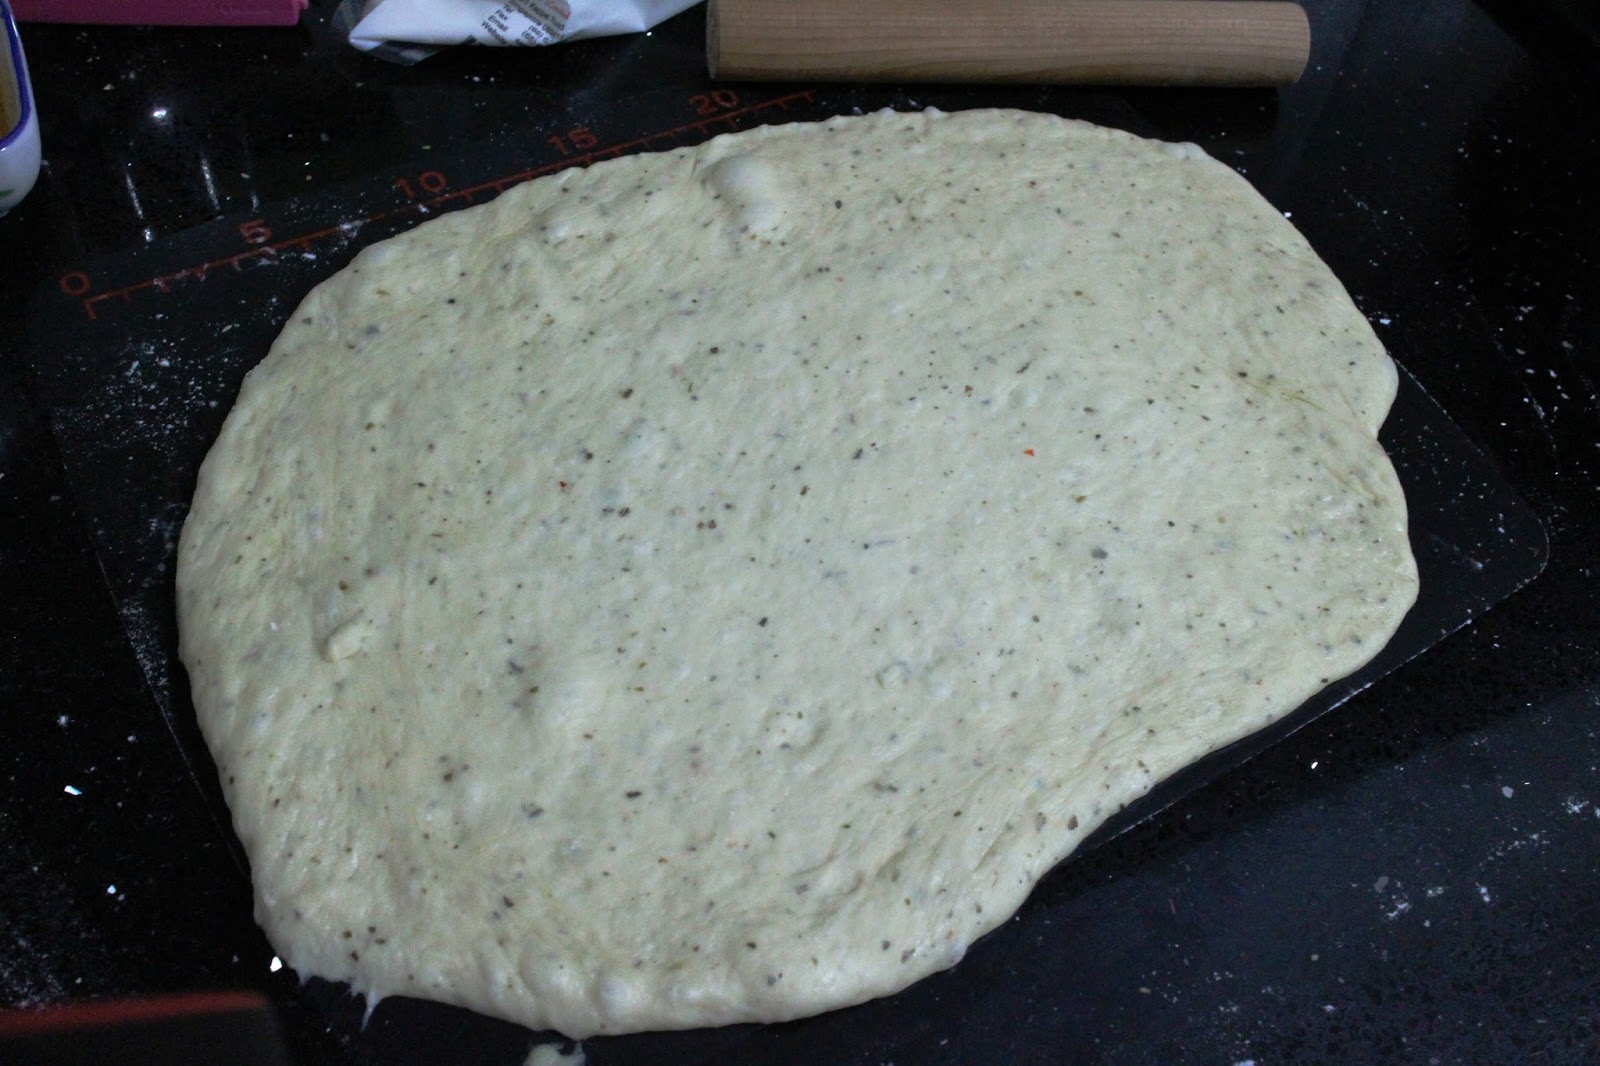
And to my surprise, the bread dough turns out firmer and not wet nor sticky. The size is big as usual. So peeps, stick to 1/2 tsp for the three additional ingredients (herbs, garlic, onion). Tried and Tested.
Brief Pictorial Illustration
 |
| All the bread dough ingredients in the bread pan, ready to start |
 |
| Menu 9 and get started |
 |
| Kneading in progress |
I thank the hot weather for once because I can easily let my dough 'sit' and double up at one corner of my service yard. Talk about Science.
Panasonic Steam Convection Oven

Next, we gonna try an alternative way to proof the dough. That is using Panasonic Steam Convection Oven. The oven has temperature as low as 40° to do the job unlike other ovens having 100° as the lowest to start with.
Forming of Loaf
Rising/Proofing Time: approx 1 hour in total
Method:
- Roll and shape it round.
- Cover it with small towel and place still for 30 mins in open.
- Once done, repeat Step 1 and sprinkle water on the dough.
- Transfer to metal tray with baking sheet on.
- Grease the baking sheet with oil.
- Place on the lower shelf of the oven.
- Choose Convection mode, 40° for 30 mins.
Brief Pictorial Illustration
Curry Making
Preparation Time: 10 mins Cooking Time: approx 30 mins
 |
| This pretty baby after 'sitting' for 30 mins in the open |
 |
| Transfer to the baking sheet on metal tray |
 |
| Proofing in progress |
 |
| After 40 mins, ready to place the stuffing |
Concurrently, we are doing the curry too. I'm using Singapore Curry sauce kit by Prima Taste. Don't judge. Using sauce kit doesn't make work lesser. There are some others details to look into for a nice pot of curry.
Preparation Time: 10 mins Cooking Time: approx 30 mins
Ingredients:
Additional ingredients:
Brief Pictorial Illustration
The Final Step
Preparation Time: 5 - 10 mins Baking Time: approx 20 - 22 mins


- 400ml of water (for boiling of curry)
- 1 pack of Prima Taste's Singapore Curry premix (coconut milk powder)
- 260ml of water (for mixing Curry premix)
- 1 tbsp of minced garlic, for frying
- 1 tbsp of minced onion, for frying
- 450g of small potatoes (about 8 potatoes), cut into chunks
- 1 carrot, cut into chunks
- 1 1/3 cup of frozen shrimps, marinated with curry paste
- 300g of mid wings (about 9 pieces), marinated with curry paste
- 2 medium eggs, boiled and de-shelled
- A handful of curry leaves
I learnt from the suggestion given on the sauce kit to marinate the mid-wings and shrimps with their curry paste. It was a great idea indeed as the mid-wings taste more succulent when it is done. Sometimes, we ought to give such suggestion a try.
- 100 g of Coconut cream
- 1 Chicken stock cube
- 2 tbsp of Sambal chilli
- 1-2 tbsp of Curry powder (other brand)
For those with heavy taste bud, you may want to add the additional ingredients but limit within your tolerance level. It is acceptable for me though.
Method:
- Marinate mid wings and shrimp with the curry paste and put overnight in fridge.
- Boil 2 eggs and set aside for later use.
- Over the stove, put in minced onion and garlic to fry for fragrance.
- Add in marinated mid-wings and excess paste to fry.
- Then add marinated shrimps to fry.
- Pour in 400ml water to the pot for boiling. Add carrots and potatoes.
- Once boiled, simmer for 10 mins at low fire.
- Mix 260ml water with Curry premix. Pour into the pot with some curry leaves.
- Simmer for another 10-15 mins at low fire. Add boiled eggs before serving.
 |
| Carrot & Potatoes cut into chunks |
 |
| The main ingredients ready to cook |
 |
| Fry minced onion and garlic |
 |
| Putting in mid-wings and shrimp with a little water |
 |
| Then add in the remaining ingredients and water to boil |
 |
| After boiled and simmered, add in the Curry Premix |
 |
| Another 7- 15 mins of simmer and ready to eat |
Preparation Time: 5 - 10 mins Baking Time: approx 20 - 22 mins
The curry should be ready before the dough. Not necessary to heat up the curry as it will be done so during the baking process. So now let's follow the steps.
1. Using a bowl, lay the baking sheet as the base before the aluminium foil. I suggest you roll out a bigger/longer aluminium foil so that you can wrap the curry properly. Then lastly wrap with the baking sheet.
2. Roll the dough as big as you can but maintain a certain depth so that the wrapping won't pierce through easily.
3. Wasn't skillful enough on the dough wrapping but look, still alright don't you think? The way I wrap up the dough was folding left and right, then top and bottom. To seal it properly, try 'pinching' them together as much as you can to prevent exposing the stuffing or leakage. Then coat with a layer of egg mixture.
4. Grease the baking sheet with oil on the metal tray and transfer the dough over. Place on the lower shelf and choose Convection mode, 180° and bake for 15 mins. Actually I should transfer the dough over to the metal tray before wrapping. Because the fear of damaging the entire dough plus stuffing during the transfer. Lesson learnt. Luckily no mishap.
 |
5. At the last 2 mins of the first bake. The baking process smoothen out the dough which makes it less ugly but bigger. Quite happy with the result and keep squeaking in silence with anticipation. This oven is awesome. Never tried baking with convection oven as I can't figure out the temperature to use compared with normal oven. I'm a newbie alright. Now I finally understand.
6. After 15 mins bake. Nice surface. So I coat with another layer of egg mixture to achieve better colouration. Then choosing the same mode as above, 200° for 5 mins. If needed, bake for another 2 mins at 180° (I did that).
There you have it. My Curry within the Garlic Bread. I'm satisfied with my 1st attempt as I have been constructing in mind on how to do it for the past few weeks. Was so afraid that it won't turn out as I wanted. But alas... it did. My husband is also happy with the result. But I'm more glad to spend that 3-4 hours in the kitchen with him as we each contributed to this success. I was still afraid that the inner layer of the bread is not properly bake. But no... is near perfection (due to the appearance). The soft and light taste of garlic bread. Also when dip with the bread, you not only get the taste of curry, but also the aroma of the herbs coming out with every bite.
My husband and I had a great time with the appliances from Panasonic Singapore. It has been almost two weeks having the oven with me and tried the various cooking mode for different purpose like steaming eggs, grilling sausages and drumsticks. Now even baking molten lava cakes besides Curry within the Garlic Bread.
So yeah! Do support the bloggers' recipes as some of them can be quite unique and innovative. Hope you like this recipe and do try it if you don't find it too simple or complicated.
This post is proudly brought to you by Panasonic Singapore and OMY.sg.